Working with R or Python
How it works . . .
In simple terms there are two new calculated variable types in Analyse: ‘Closed with extension’ and ‘Numeric with extension’. They have the same functionality but are designed to store categorical or numeric data, respectively. We shall focus on the latter.
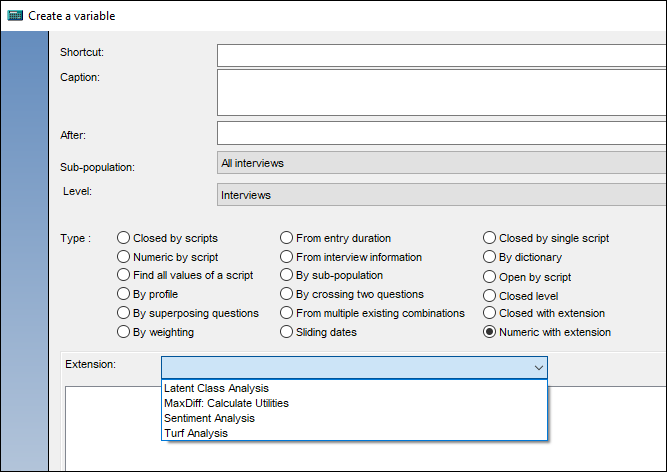
There is a list of analyses to pick from for the variable. The list is populated by looking for an XML definition file in your script extensions directory. I’ll come back to the contents of these XMLs in a moment.

The sub-directories contain the script files which tell the external software what to do (Python script files ‘.py‘ and R script files ‘.R‘).
Special thanks go out to our current intern and adept computer scientist, Léna Sasal, who has developed the R & Python scripts for Latent Class Analysis, Sentiment Analysis and Turf Analysis, and been invaluable in the whole integration process!
When the new version of Analyse is installed, the existing scripts and XMLs we have developed will be saved in C:\ProgramData\Askia\AnalyseExtensions. However, users can also develop their own scripts and XMLs. By simply dropping these into the extensions folder, they will be added to the list seen in the calculated variable.
We can think of this in the same way as a user developing an ADC (Askia Design Control) and dropping it into their ADC library for use in their survey.
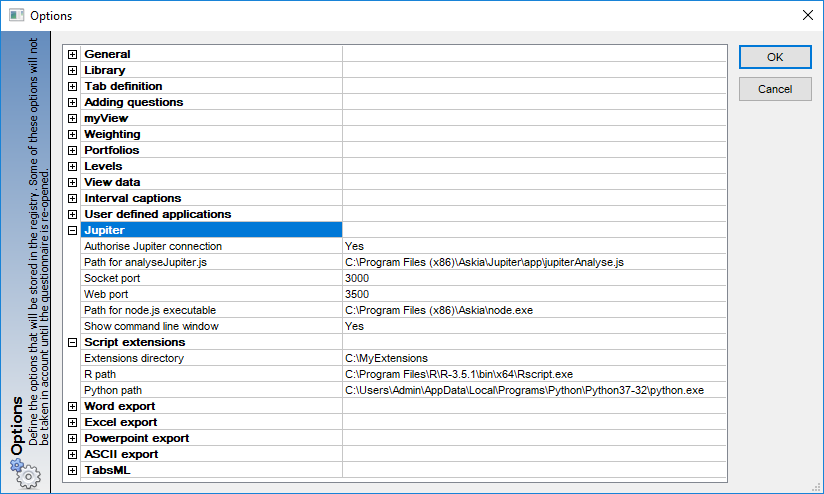
As mentioned, Analyse now has an API implemented and can be used once the correct ‘Jupiter’ settings are entered in your Analyse options shown above. This is key because it allows the data from within your .qes or .qew file to be sent to and received from an external application through http communication.

For example, below, I’m sending the data for two questions, i1_Gender & i2_Age from my .qes file to a web browser using the API call: http://localhost:3500/analyse/api/interviews?questions[]=i1_Gender&questions[]=i2_Age

When you run an analysis in R or Python, it can be triggered from the command line. The generic format of the command line roughly followed is as below:

- Path to application – this is set in your Analyse options (R path / Python path / or other executable).
- Path to your script file – this is the generic ‘Extensions directory’ set in your Analyse options followed by the sub-directory name and script filename within it.
- Analysis specific parameters – these can be things such as . . .
- The name(s) of variable(s) storing the data you want to analyse.
- The number of classes or categories for the analysis to return.
- Generic parameters – these can be things such as . . .
- The current question, when the analysis is writing back to the calculated variable you are creating.
- The output directory, e.g. if you’re outputting to a CSV rather than to the calculated variable. Currently the output directory is the .dat folder for the data file worked on – the R or Python script will append the filename to the output directory.
e.g. for Turf Analysis:
“C:\Program Files\R\R-3.5.1\bin\x64\Rscript.exe” “C:/Users/lena/AnalyseExtensions/TurfAnalysis/Turf.R” “Where” 5 2 4 “C:\Users\Admin\Desktop\lena\~Surveys~\BeerSurveyWithComments.dat\Turf2019-06-14_10-45-03.csv” “localhost:3500” “Wgt1Var”
The XML file here is crucial. Its aim is two-fold:
- To create a menu in the calculated variable where you can enter your analysis specific parameters.
- To generate the command line syntax, on-the fly, when saving your calculated variable so it is interpreted and processed by the external application.
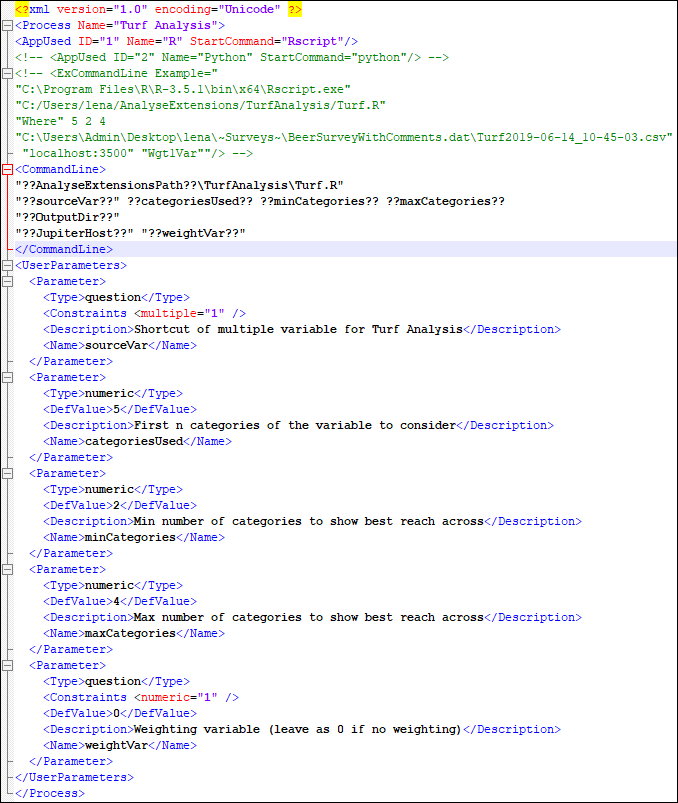
The ‘user specific parameters’ need to be defined for each analysis in the <UserParameters> section of the xml . . .
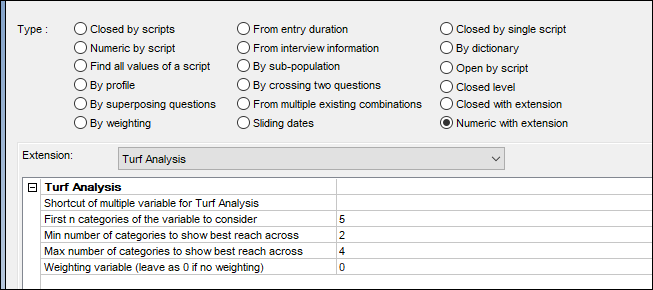
- Analyse will check this section of the XML and create a row for each <Parameter> tag allowing you to enter question shortcuts or various numeric parameters in the calculated variable interface.
- Analyse will check the <CommandLine> section of the XML substituting the settings, generic and analysis specific parameters to create the command line which will be used by R or Python to run the analysis.
Another XML example is shown here.
What you need to use this functionality?
- Some basic experience of R or Python is almost essential for the initial set-up. We’ll improve that soon.
- Install Askia Analyse 5.5.2 or higher.
- Install latest versions of R and Python (currently R 3.6.0 & Python 3.7.3).
- For R (64 bit recommended), install Java 64 bit.
- For R, install latest 📥 AskiaPackage_X.0.zip (contains functions used by the R scripts) and the packages for the Analyses run in R. They can be downloaded here.
- Set your Jupiter & Script extension settings in Analyse options.
- Ensure your script extension path contains the XML files as well as the sub-directories named appropriately and containing your R or Python script files.
Latest updates
- With the latest 5.5.3 (or higher) AskiaSuite installer, there is an option to also install R at the same time. This is preferable over any manual installation as it ensure the correct set-up files are in place in the right locations.
- You can find a detailed user manual here which is essential reading for anyone wanting to gain a more in-depth understanding of the existing extensions and to help create their own.